Imagine holding a delicate, intricately designed object in your hands, its surface as smooth as glass, every detail brought to life with precision. This is the magic of SLA 3D printing, a technology that allows us to create objects with unparalleled accuracy and intricacy.
However, as any seasoned 3D printing enthusiast will tell you, the journey doesn’t end with the final layer of resin. The true masterpiece emerges during the post-processing phase, where the raw print transforms into a polished, refined work of art. In this guide, we’ll delve deep into the world of post-processing techniques for SLA 3D prints, uncovering the secrets to achieving professional-grade finishes.
From sanding and smoothing to the art of painting and intricate detailing, we’ll leave no stone unturned. You’ll learn the essential materials, techniques, and safety precautions necessary to bring your SLA prints to life. Whether you’re a seasoned pro or just starting on your 3D printing journey, this guide is packed with valuable insights and practical tips.
So, grab your tools and let’s embark on a journey to discover the finishing touches that truly matter in the world of SLA 3D printing.
Understanding SLA 3D Printing
In the realm of 3D printing, Stereolithography (SLA) stands as a testament to precision and detail. This additive manufacturing process utilizes a vat of liquid photopolymer resin that’s solidified layer by layer using a UV laser or other light sources. The result? Incredibly intricate and accurate 3D models.
How Does SLA Differ from Other 3D Printing Techniques?
To truly appreciate the nuances of post-processing for SLA prints, it’s crucial to understand how this method sets itself apart:
| **Aspect** | **SLA 3D Printing** | **Fused Deposition Modeling (FDM)** |
| Print Resolution | Unparalleled precision, allowing for intricate details. | Coarser resolution compared to SLA. |
| Layer Height | Extremely thin layers, resulting in smoother surfaces. | Layer height is relatively thicker, leading to visible layers. |
| Surface Finish | Minimal visible layer lines, smoother overall finish. | Layer lines are often noticeable on the final print. |
| Material Used | Photopolymer resins that cure under UV light. | Filament materials such as PLA, ABS, etc. |
| Support Structure | Utilizes supports that are generated and easily removable. | Supports are typically bulkier and require more effort to remove. |
| Print Speed | Slower due to the precise curing of each layer. | Faster printing due to extrusion process. |
Applications of SLA 3D Printing
SLA technology finds its place in various industries and applications, owing to its high level of detail and accuracy:
- Prototyping: Architects, engineers, and product designers use SLA prints to create prototypes with intricate details, providing a clear visual representation of their designs.
- Dental and Medical Models: SLA is widely used in the healthcare industry for creating anatomical models, dental models, and surgical guides with precise detailing.
- Jewelry Design: Jewelry designers use SLA to create intricate, high-detail pieces that would be challenging to achieve through traditional methods.
- Miniatures and Figurines: Hobbyists and enthusiasts turn to SLA for producing detailed miniatures and figurines for tabletop gaming and collectibles.
- Aerospace and Automotive Components: SLA is utilized in creating intricate components and prototypes for aerospace and automotive applications, where precision is paramount.
- Art and Sculpture: Artists leverage SLA technology to bring their visions to life with unmatched precision and intricacy.
Understanding the unique strengths of SLA 3D printing lays the foundation for effective post-processing techniques. In the next section, we’ll delve into the essential materials and equipment needed to bring out the best in your SLA prints.
Materials and Equipment Needed
Achieving professional-grade finishes on SLA 3D prints requires the right set of materials and equipment. Here’s a comprehensive list of what you’ll need:
Essential Materials:
- Photopolymer Resin:
– Different resins cater to various applications. Consider factors like color, transparency, and flexibility when choosing the resin for your project.
- Isopropyl Alcohol (IPA):
– IPA is essential for rinsing and cleaning SLA prints. Opt for a high-purity variant for best results.
- Disposable Nitrile Gloves:
– Protect your hands from direct contact with resin and cleaning solutions.
- Safety Goggles and Respirator Mask:
– Ensure your safety by wearing goggles and a mask to shield against any potential fumes or splashes.
- Sandpaper (Various Grits):
– A range of sandpaper grits from coarse to fine is necessary for smoothing and finishing surfaces.
- Filling and Patching Compounds:
– Depending on your project, you may need putty, epoxy, or other filling materials to address imperfections.
- Primer:
– Choose a high-quality primer suitable for 3D prints to provide a smooth surface for painting.
- Paints and Brushes:
– Acrylic paints are commonly used for 3D prints. Quality brushes ensure a precise application.
- Clear Coat or Sealant:
– A clear coat protects the painted surface and enhances the overall finish.
Recommended Tools and Equipment:
- UV Light Source:
– Essential for curing resin during post-processing. UV lamps or curing stations are commonly used.
- Sandpaper Holder or Block:
– Provides stability and control while sanding, ensuring even surfaces.
- Filling and Sculpting Tools:
– Includes spatulas, sculpting knives, and other tools for precise filling and detailing.
- Resin Catcher or Strainer:
– Helps filter out cured resin particles when reclaiming excess resin.
- Ventilation System:
– If working with resin indoors, consider a well-ventilated area or a fume extractor to ensure proper air circulation.
- Painting Palette and Mixing Tools:
– Necessary for blending and customizing paint colors for your project.
- Safety Workbench or Area:
– A designated workspace with proper ventilation and lighting for safe post-processing.
- Cleaning Station:
– A dedicated area for rinsing and cleaning SLA prints, equipped with containers for IPA and disposal of used cleaning materials.
Having the right materials and equipment sets the stage for successful post-processing. In the next section, we’ll cover crucial safety precautions to ensure a smooth and secure workflow.
Safety Precautions
When it comes to post-processing SLA 3D prints, safety should always be a top priority. The materials and chemicals involved can pose certain risks if not handled properly. Here’s a detailed guide on the essential safety precautions:
1. Ventilation is Key:
– Ventilated Workspace:
– Always work in a well-ventilated area. If possible, set up near an open window or use a fume extractor.
– Use a Respirator:
– Wear a respirator mask to protect against inhaling fumes or particles from resin and chemicals.
2. Protective Gear:
– Safety Goggles and Gloves:
– Wear safety goggles to shield your eyes from splashes or fumes. Nitrile gloves provide a barrier between your skin and chemicals.
3. Handling Resin:
– Avoid Skin Contact:
– Minimize direct skin contact with resin. If contact occurs, wash thoroughly with soap and water.
– Proper Dispensing:
– Use a funnel or pour carefully to avoid spills or drips.
4. Isopropyl Alcohol (IPA):
– Avoid Open Flames:
– IPA is flammable. Use it in a well-ventilated area, away from open flames or heat sources.
– Proper Storage:
– Store IPA in a cool, dry place, away from direct sunlight.
5. Handling Sandpaper:
– Dust Protection:
– Wear a dust mask or respirator when sanding to avoid inhaling particles.
– Proper Disposal:
– Dispose of used sandpaper and dust in a sealed bag to prevent inhalation.
6. Emergency Preparedness:
– Eye Wash Station:
– Have an eye wash station nearby in case of accidental splashes to the eyes.
– Spill Kit:
– Keep a spill kit with absorbent materials in case of spills or accidents.
7. Clean-Up Procedures:
– Containment and Disposal:
– Use designated containers for resin and chemical waste. Dispose of them according to local regulations.
– Clean Work Area Regularly:
– Wipe down surfaces to prevent buildup of resin or chemicals.
8. Training and Education:
– Know Your Materials:
– Understand the properties and risks associated with the materials you’re working with.
– Stay Informed:
– Keep up-to-date with safety guidelines and best practices for handling 3D printing materials.
By following these safety precautions, you create a secure working environment for post-processing your SLA 3D prints. In the next section, we’ll dive into the crucial steps to take before initiating the post-processing phase.
Preparation Before Post-Processing
Before you embark on the journey of post-processing your SLA 3D prints, it’s essential to lay the groundwork for a successful finish. This phase involves cleaning the print, removing supports, and evaluating the surface for imperfections.
1. Cleaning the SLA Print:
– Rinsing in Isopropyl Alcohol (IPA):
– Submerge the print in a container filled with IPA. Agitate gently to remove excess resin.
– Double Rinse:
– For optimal results, perform a second rinse in fresh IPA to ensure thorough cleaning.
– Air Drying:
– Allow the print to air dry on a clean surface or use a gentle stream of compressed air.
2. Removing Supports and Excess Resin:
– Careful Support Removal:
– Use support removal tools to gently detach supports from the print. Take care to avoid damaging delicate features.
– Use of Flush Cutters:
– Flush cutters help trim excess support material with precision.
– Post-Cure if Necessary:
– If the print requires further curing, follow the manufacturer’s recommended post-curing instructions.
3. Surface Inspection and Evaluation:
– Visual Inspection:
– Examine the surface of the print under good lighting to identify imperfections or areas that may need further attention.
– Tactile Inspection:
– Run your fingers over the surface to feel for any rough spots, bumps, or inconsistencies.
– Magnification for Detail:
– Use a magnifying glass or a microscope for a closer look at intricate details.
– Marking Imperfections:
– Use a pencil or marker to mark areas that require specific attention during the post-processing phase.
By taking these meticulous steps in preparation, you set the stage for a smoother post-processing journey. In the next section, we’ll delve into the art of sanding and smoothing, an integral part of achieving a flawless finish on your SLA 3D prints.
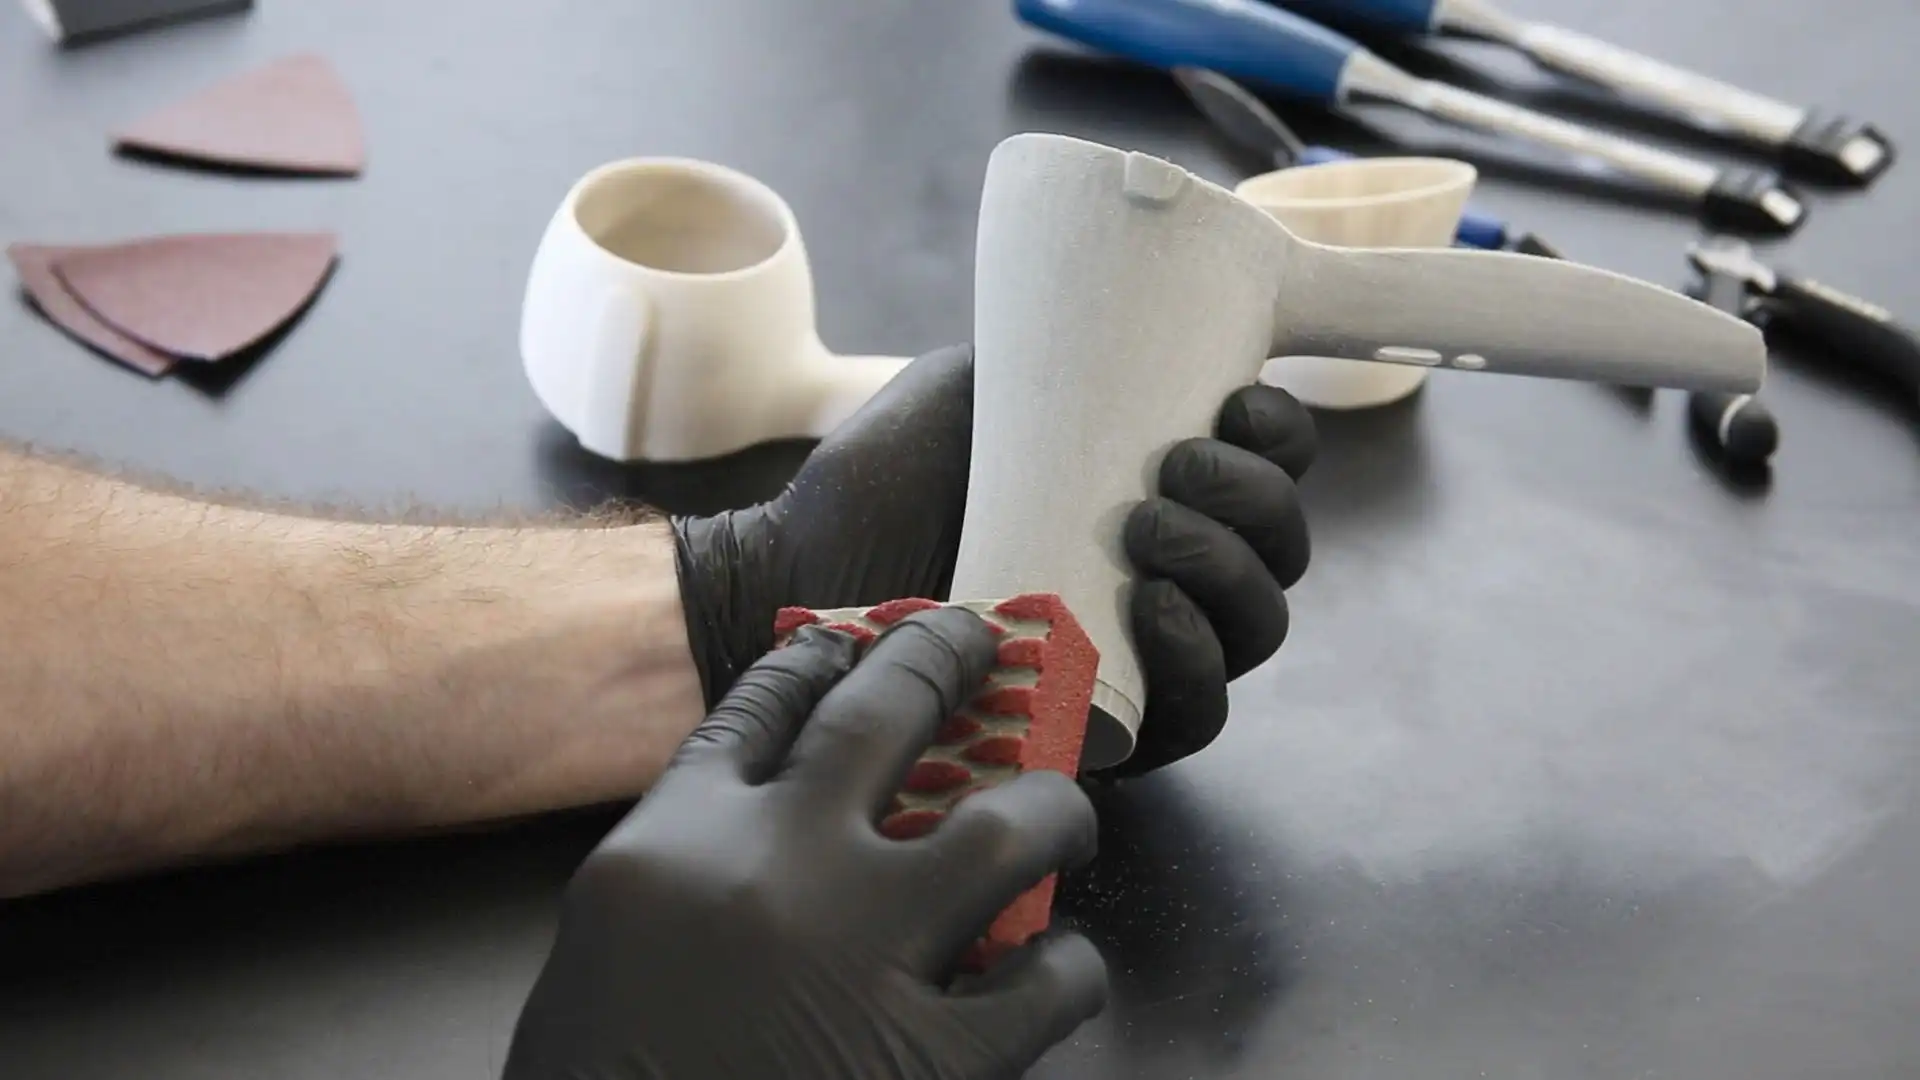
Sanding and Smoothing Techniques
Sanding and smoothing are critical steps in the post-processing journey of SLA 3D prints. These techniques help achieve a polished surface, enhancing the overall aesthetic and feel of the print.
1. Choosing the Right Sandpaper Grits:
– Coarse Grit (80-120):
– Use for initial sanding and removing larger imperfections or rough surfaces.
– Medium Grit (150-240):
– Provides a balance between smoothing and maintaining detail. Ideal for general smoothing.
– Fine Grit (320-600):
– Use for fine-tuning and preparing the surface for painting or further finishing.
– Extra Fine Grit (800-2000+):
– Used for achieving a high-gloss finish or for extremely detailed prints.
2. Wet vs. Dry Sanding Methods:
– Dry Sanding:
– Suitable for initial sanding stages. Requires a steady hand to avoid over-sanding.
– Wet Sanding:
– Involves using water as a lubricant to minimize dust and prevent clogging of sandpaper. Provides a smoother finish.
3. Achieving Smooth and Even Surfaces:
– Consistent Pressure:
– Apply even pressure while sanding to avoid uneven surfaces.
– Circular Motion:
– Use circular motions to ensure uniform smoothing.
– Focusing on Details:
– Pay special attention to intricate areas that may require extra care.
– Frequent Inspection:
– Periodically inspect the surface to track progress and identify areas that need more attention.
4. Safety Considerations:
– Use Dust Masks or Respirators:
– Protect yourself from inhaling fine particles generated during sanding.
– Protective Eyewear:
– Shield your eyes from potential debris or particles.
– Proper Disposal of Dust:
– Collect sanding dust and dispose of it in a sealed bag to prevent inhalation.
By employing these techniques and following safety guidelines, you’ll transform your SLA 3D print into a beautifully smooth canvas, ready for the next steps in the post-processing journey. In the next section, we’ll explore filling and patching techniques to address any remaining imperfections.
Filling and Patching Techniques
Even after sanding and smoothing, some SLA 3D prints may have minor imperfections or gaps that need attention. Filling and patching techniques come to the rescue, ensuring a flawless finish.
1. Types of Fillers for SLA Prints:
– Epoxy Putty:
– Ideal for filling larger gaps or holes. Can be sculpted and sanded for a seamless finish.
– UVResin:
– Provides precise filling for small imperfections. Cures under UV light for a strong bond.
– Modeling Putty:
– Versatile and easy to work with. Can be used for both filling and sculpting.
– Acrylic Filler:
– Water-based and easy to clean up. Suitable for minor surface imperfections.
2. Techniques for Filling Gaps, Holes, and Imperfections:
– Preparation:
– Ensure the area is clean and dry before applying any filler.
– Application:
– Use a spatula or sculpting tool to apply the chosen filler. Work it into the imperfection and smooth out the surface.
– Sculpting and Shaping:
– For epoxy putty and modeling putty, sculpt or shape the filler as needed before it fully hardens.
– Sanding After Filling:
– Once the filler is fully cured, sand the area to blend it seamlessly with the rest of the surface.
3. Safety Considerations:
– Ventilation:
– Ensure you’re working in a well-ventilated area when using fillers, especially epoxy putty.
– Gloves:
– Wear gloves to protect your hands from direct contact with fillers.
– Eye Protection:
– Safety goggles can shield your eyes from any potential splashes or particles.
4. Choosing the Right Filler:
– Consider the Size of Imperfections:
– Match the filler type to the size of the imperfection. For small gaps, UV resin might be sufficient, while larger holes may require epoxy putty.
– Compatibility with Resin:
– Ensure the filler material is compatible with the type of resin used for the print.
By employing these filling and patching techniques, you’ll address any remaining imperfections, ensuring a flawless surface for the next steps in the post-processing journey. In the next section, we’ll cover priming for painting to achieve a professional finish.
Priming for Painting
Priming is a pivotal step in the post-processing journey of SLA 3D prints. It provides a smooth, uniform surface that allows paint to adhere properly, resulting in a professional-grade finish.
1. Importance of Priming:
– Creates an Even Surface:
– Fills in any remaining imperfections and levels out the surface for an even coat of paint.
– Improves Paint Adhesion:
– Allows paint to grip onto the surface, preventing flaking or peeling over time.
– Enhances Paint Vibrancy:
– A well-primed surface brings out the true colors of the paint, resulting in a more vibrant finish.
2. Types of Primers Suitable for SLA Prints:
– Spray Primer:
– Provides a thin, even coat suitable for intricate details. Requires careful application to avoid over-spraying.
– Brush-On Primer:
– Offers more control over application, making it ideal for specific areas or small prints.
– Airbrush Primer:
– Achieves a fine, controlled spray for a seamless and professional finish.
3. Proper Application and Drying Time:
– Clean Surface:
– Ensure the SLA print is clean and free from dust or debris before applying primer.
– Even Application:
– Apply primer in thin, even coats. Avoid over-saturating the surface.
– Allow Sufficient Drying Time:
– Follow the manufacturer’s instructions for drying time. This ensures the primer properly adheres to the surface.
4. Safety Considerations:
– Ventilation:
– Work in a well-ventilated area to minimize inhalation of fumes.
– Use Respirator or Mask:
– Especially important when working with spray primers to protect against fumes and particles.
– Protective Eyewear:
– Safeguard your eyes from potential splashes or overspray.
5. Priming Troubleshooting:
– Avoiding Over-Priming:
– Apply primer in thin layers to prevent obscuring fine details.
– Addressing Runs or Drips:
– Sand down any excess primer and reapply in thin coats.
– Checking for Uneven Coating:
– Inspect the surface for any spots that may need additional priming.
By following these priming techniques and safety guidelines, you’ll ensure a solid foundation for the painting phase. In the next section, we’ll explore various painting techniques to bring your SLA print to life with vibrant colors and intricate details.
Painting Techniques
Painting is where your SLA 3D print truly comes to life, adding color, texture, and depth to your creation. Here, we’ll delve into various techniques and considerations for achieving a professional paint finish.
1. Choosing the Right Paints:
– Acrylic Paints:
– Widely used for their versatility, fast drying time, and wide range of colors.
– Enamel Paints:
– Provide a durable finish, making them suitable for functional or outdoor prints.
– Airbrush Paints:
– Designed for use with airbrushing equipment, offering fine control over application.
2. Brush vs. Spray Painting Methods:
– Brush Painting:
– Offers precision and control, making it ideal for smaller details and intricate areas.
– Spray Painting:
– Provides a smooth, even coat over larger surfaces. Requires proper ventilation and masking of delicate areas.
3. Layering and Blending Techniques:
– Dry Brushing:
– Using a nearly dry brush with minimal paint to add highlights and texture.
– Wet Blending:
– Blending two or more colors directly on the model for smooth transitions.
– Layering for Depth:
– Building up multiple thin layers of paint to create depth and richness.
4. Adding Intricate Details:
– Fine Brushes and Tools:
– Use fine-tipped brushes and tools for precision work and small details.
– Masking Techniques:
– Use masking tape or liquid masking to protect areas from unwanted paint.
5. Allowing for Drying Time:
– Between Layers:
– Ensure each layer of paint is fully dry before applying the next.
– Final Clear Coat:
– Apply a clear coat to protect the paint and provide a finished look.
6. Weathering and Special Effects:
– Dry Brushing for Weathering:
– Use a light, contrasting color to highlight edges and create a weathered effect.
– Applying Washes:
– Thin down dark paint and apply to recessed areas for added depth and realism.
– Adding Special Effects:
– Techniques like stippling, sponging, or splattering for unique textures or effects.
By employing these painting techniques, you’ll breathe life into your SLA 3D print, transforming it into a vibrant, visually stunning piece. In the next section, we’ll cover detailing and assembly to add those final touches that truly make your creation stand out.
Detailing and Assembly
Detailing and assembly are the finishing touches that elevate your SLA 3D print to a professional level. This phase involves adding small elements, combining multiple parts, and ensuring everything fits together seamlessly.
1. Adding Small Details:
– Microbrushes and Fine Tools:
– Use microbrushes and precision tools to add tiny details, such as rivets, buttons, or surface textures.
– Decals and Transfers:
– Apply decals or transfers for intricate designs or logos.
2. Paint Touch-Ups:
– Fine Brushwork:
– Use fine brushes for touch-ups to correct any small imperfections in the paintwork.
– Blending Techniques:
– Blend the touch-up paint seamlessly with the surrounding areas.
3. Combining Multiple Parts:
– Dry Fitting:
– Before applying any adhesive, ensure all parts fit together correctly and make any necessary adjustments.
– Using Adhesives:
– Choose the appropriate adhesive for the materials you’re working with, whether it’s super glue, epoxy, or specific model glues.
4. Testing Articulation (if applicable):
– Ensure Proper Movement:
– If your print has moving parts, test them to ensure they move smoothly without any obstructions.
– Adjusting Tolerances:
– Make any necessary adjustments to tolerances to ensure parts fit together snugly.
5. Final Inspection and Cleaning:
– Thorough Examination:
– Inspect the entire print for any remaining imperfections or areas that may need further attention.
– Cleaning:
– Wipe down the print to remove any dust or fingerprints that may have accumulated during the detailing process.
6. Applying a Final Finish:
– Clear Coat or Sealant:
– Apply a final clear coat to protect the surface and provide a uniform finish.
– Matte or Gloss Finish:
– Choose a finish that complements the overall aesthetic of your print.
By paying careful attention to detailing and assembly, you’ll ensure that every aspect of your SLA 3D print is refined and seamless. In the final section, we’ll conclude our journey by reflecting on the transformative power of post-processing techniques for SLA prints.
Conclusion: Unleashing the Potential of Post-Processing
The journey from a freshly printed SLA model to a meticulously finished masterpiece is a testament to the transformative power of post-processing techniques. Each step, from cleaning and smoothing to painting and assembly, contributes to the evolution of a raw print into a refined work of art.
Embracing Imperfections:
– Acknowledge that imperfections are part of the creative process. They add character and uniqueness to your creation.
Patience and Precision:
– Post-processing demands patience and a keen eye for detail. Take your time, and don’t rush through any step.
Safety First:
– Prioritize safety by wearing protective gear, working in well-ventilated spaces, and handling chemicals responsibly.
The Joy of Creation:
– Post-processing is a labor of love, a journey of turning a vision into reality. Embrace the satisfaction of seeing your print come to life.
Your Artistic Signature:
– Every post-processed print bears your unique touch. It’s a reflection of your creativity, skill, and dedication.
As we conclude this guide, remember that post-processing is an art form in itself. It’s a journey of exploration and refinement, where each technique and choice contributes to the final masterpiece. Embrace the process, enjoy the journey, and revel in the satisfaction of unveiling a beautifully finished SLA 3D print.
With the knowledge and skills gained from this guide, you’re equipped to embark on your own post-processing adventures. Let your creativity soar, and may your finished prints be a source of pride and inspiration.
Happy crafting!