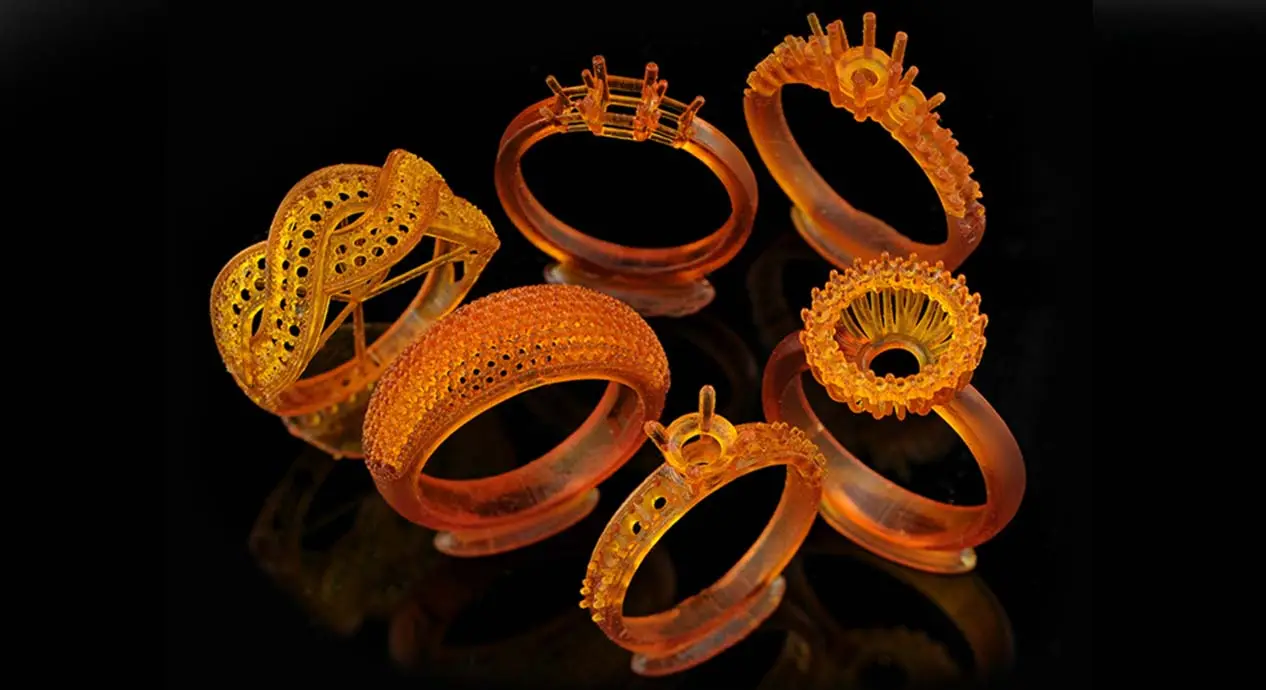
In the ever-evolving world of jewelry design, innovative technologies continue to revolutionize the way we create and produce exquisite pieces. Among these advancements, DLP (Digital Light Processing) 3D printing has emerged as a game-changer, offering unparalleled precision and versatility in jewelry casting. If you’re a jewelry designer or manufacturer looking to explore new horizons, this step-by-step guide will demystify the process of using DLP 3D printing for jewelry casting, showcasing its advantages and potential applications.

Throughout this article, we’ll delve into the process of using DLP 3D printing for jewelry casting, starting with choosing the right printer, preparing your design, and printing your masterpiece. We’ll then guide you through the lost-wax casting process and share tips for refining and finishing your cast jewelry pieces. Finally, we’ll showcase some inspiring case studies and discuss the future of DLP 3D printing in the jewelry industry.
Choosing the Right DLP 3D Printer for Jewelry Casting
When it comes to selecting the perfect DLP 3D printer for jewelry casting, several factors come into play. From resolution and print speed to material compatibility and cost, finding the right machine can make all the difference in achieving the desired results. In this article, we’ll explore these factors and highlight some popular DLP 3D printers that cater specifically to jewelry casting needs.
Factors to Consider
1. Resolution
The resolution of a DLP 3D printer determines the level of detail it can achieve in your prints. Higher resolution printers offer finer details, making them ideal for intricate jewelry designs. Look for printers with a minimum resolution of 25 microns or less for optimal results.
2. Print Speed
While resolution is crucial, print speed also plays a significant role in the efficiency of your jewelry production process. Faster printers can help you save time and increase productivity, especially when working on multiple projects simultaneously.
3. Material Compatibility
Jewelry casting often requires the use of specialized resins designed for high-precision and durability. Ensure your chosen DLP 3D printer is compatible with a wide range of materials, including wax-like resins for lost-wax casting.
4. Cost
Investing in a DLP 3D printer can be a significant financial commitment. Consider your budget and weigh the costs against the benefits of each printer model. Keep in mind that higher-end printers may offer better long-term value due to their superior performance and reliability.
5. Brand Reputation
Research the reputation of the printer manufacturer to ensure you’re investing in a reliable and well-supported product. Look for reviews and testimonials from other jewelry professionals who have experience with the printer you’re considering.
Popular DLP 3D Printers for Jewelry Casting
Here are some of the most popular DLP 3D printers among jewelry designers and manufacturers:
| Printer Model | Resolution | Print Speed | Material Compatibility | Cost |
| EnvisionTEC Perfactory | 25 microns | Moderate | Wide range of resins | $20,000+ |
| Asiga Pro2 | 25 microns | Fast | Wax-like resins | $10,000+ |
| Peopoly Phenom | 25 microns | Fast | Various resins | $7,000+ |
| B9Creator v1.2 | 25 microns | Fast | Wide range of resins | $5,000+ |


Each of these printers offers unique features and advantages, so it’s essential to evaluate your specific needs and preferences before making a decision. By carefully considering the factors mentioned above and researching popular models, you’ll be well-equipped to choose the right DLP 3D printer for your jewelry casting endeavors.
Preparing Your Design for DLP 3D Printing in Jewelry Casting
With your DLP 3D printer selected and ready to go, it’s time to focus on preparing your design for the printing process. Crafting a successful jewelry piece begins with a well-designed model that takes into account the unique requirements of DLP 3D printing. In this article, we’ll explore tips for designing jewelry pieces suitable for DLP 3D printing, recommended design software, and best practices for file preparation.
Designing for DLP 3D Printing

When designing jewelry pieces for DLP 3D printing, there are several guidelines to follow to ensure the best possible results:
- 1. Wall Thickness
- Maintain a minimum wall thickness of at least 0.6 mm to ensure structural integrity and prevent breakage during the printing and casting processes. Thinner walls may result in fragile parts that are prone to damage.
- 2. Support Structures
- Design your piece with support structures in mind. Identify areas that may require additional support during printing, such as overhangs, thin bridges, and delicate details. These areas should be reinforced with support structures during the printing process.
- 3. Finishing Considerations
- Consider the finishing techniques you’ll use after printing and casting, such as polishing, stone setting, and plating. Ensure your design allows for easy access to these areas and accommodates any necessary adjustments.
Design Software Recommendations
Choosing the right design software is crucial for creating detailed and accurate jewelry models. Here are some popular options:

Rhino
Widely used in the jewelry industry for its powerful modeling capabilities and compatibility with various plugins.
Offers a user-friendly interface and extensive customization options.
Blender
A free and open-source 3D modeling software with a growing community of users in the jewelry industry.
Provides a wide range of modeling tools and can be extended with add-ons for specific jewelry design tasks.


Matrix
A specialized jewelry design software that offers advanced modeling tools and a streamlined workflow for creating complex designs.
Known for its ease of use and integration with other CAD/CAM systems.
JewelCAD
A dedicated jewelry design software with a focus on precision and efficiency.
Offers a wide range of tools for creating custom jewelry pieces, including gemstone setting and metal casting simulations.

Best Practices for File Preparation
Once your design is complete, it’s essential to prepare your files correctly for DLP 3D printing. Follow these best practices to ensure a smooth printing process:
1. File Format
Save your design in a universally accepted format, such as STL, OBJ, JCD or J3D which can be easily imported into your printer’s slicing software.
2. Mesh Repair
Check your model for any errors, such as non-manifold geometry, self-intersecting faces, or holes. Use mesh repair tools in your design software or a standalone program like Netfabb to fix these issues.
3. Scaling
Ensure your design is scaled appropriately for your intended size. Check the printer’s documentation for guidance on scaling and adjust your model accordingly.
4.Orientation
Optimize the orientation of your model for printing. Place the piece in a position that minimizes support structures and maximizes print quality.
By following these tips and guidelines, you’ll be well-prepared to design and prepare your jewelry models for DLP 3D printing. With the right design software and attention to detail, you’ll be able to create stunning and intricate pieces that showcase the full potential of this cutting-edge technology.
Printing Your Design with DLP 3D Printing for Jewelry Casting
With your design prepared and your DLP 3D printer ready to go, it’s time to focus on the printing process itself. In this article, we’ll walk you through the steps involved in printing your jewelry design using DLP 3D printing, including material selection, pre-print settings, and post-processing steps. We’ll also address common troubleshooting tips to help you overcome any issues that may arise during the printing process.
Setting Up Your DLP 3D Printer
Before you begin printing, it’s essential to set up your DLP 3D printer properly. Follow these steps to ensure a successful print:
1. Material Selection

Choose a suitable resin for your jewelry casting project. Look for resins specifically formulated for jewelry casting, such as wax-like resins that can withstand the lost-wax casting process. Popular resin brands for jewelry casting include EnvisionTEC, Asiga, and Peopoly.
2. Pre-print Settings

Adjust your printer’s settings according to the manufacturer’s recommendations and the specific resin you’re using. Key settings to consider include:
- Layer Height: Set the layer height to achieve the desired level of detail. Lower layer heights result in smoother surfaces but longer print times.
- Exposure Time: Adjust the exposure time based on the resin’s curing properties and the printer’s documentation. Longer exposure times may lead to stronger prints but can also increase print times.
3. Printing
Load your prepared design file into the printer’s slicing software and start the printing process. Monitor the print progress and make any necessary adjustments to the settings as needed.
Post-Processing Steps

After your print is complete, it’s essential to perform post-processing steps to clean, cure, and remove support structures from your jewelry piece. Follow these steps to ensure a high-quality final product:
1. Cleaning
Remove the printed piece from the printer and clean it thoroughly using isopropyl alcohol (IPA) or another suitable cleaning agent. Gently agitate the piece in a container filled with IPA to remove any uncured resin.
2. Curing
Place the cleaned piece in a UV curing chamber or under a UV lamp to fully cure the resin. Follow the manufacturer’s recommendations for curing times and UV intensity.
3. Removing Supports
Carefully remove any support structures from your jewelry piece using flush cutters or a scalpel. Be cautious not to damage the delicate features of your design.
Troubleshooting Common Issues
Despite your best efforts, you may encounter issues during the printing process. Here are some common problems and solutions to help you troubleshoot:
1. Warping
- Cause: Inadequate adhesion to the build plate or uneven temperature distribution.
- Solution: Increase the initial layer height, apply a thin layer of glue or hairspray to the build plate, or adjust the temperature settings.
2. Incomplete Prints
- Cause: Insufficient exposure time or faulty hardware components.
- Solution: Increase the exposure time, check for clogged nozzles or worn-out parts, and replace any faulty components as needed.
3. Surface Defects
- Cause: Poor resin quality, incorrect layer height, or excessive vibration during printing.
- Solution: Use high-quality resin, adjust the layer height, and stabilize the printer on a solid surface away from sources of vibration.
By following these steps and troubleshooting tips, you’ll be well-prepared to print your jewelry design using DLP 3D printing. With practice and experience, you’ll be able to refine your printing skills and produce even more intricate and beautiful jewelry pieces.
Lost-Wax Casting Process for DLP 3D Printed Jewelry
Having successfully printed your jewelry design using DLP 3D printing, the next step is to transform your resin model into a precious metal piece through the lost-wax casting process. This ancient technique has been adapted for modern jewelry manufacturing, allowing for the creation of intricate and detailed pieces. In this article, we’ll guide you through the lost-wax casting process, from creating a wax tree to refining your cast jewelry piece.
Creating a Wax Tree
A wax tree is a structure used to hold multiple wax models together for casting. This method helps maximize efficiency by casting multiple pieces simultaneously. To create a wax tree:
- Sprue Design and Placement
- Design a sprue system that connects your resin model to the wax tree. The sprue acts as a channel for the molten metal to flow into the mold cavity.
- Place the sprues strategically to ensure proper metal flow and minimize the formation of air bubbles.
- Investment Material Selection
- Choose an investment material suitable for the type of metal you plan to cast. Common investment materials include plaster, silica, and zirconia-based compounds.
- Ensure the investment material can withstand the high temperatures required for casting and provides sufficient shrinkage allowance for the metal.
- Creating the Wax Tree
- Attach your resin model to the wax tree using the sprue system.
- Coat the entire assembly with a release agent to prevent the investment material from sticking to the wax.
- Pour the investment material over the wax tree, ensuring it completely surrounds and encapsulates the resin model and sprues.
Burnout and Casting Procedures
Once the investment material has hardened, the burnout and casting procedures can begin. These steps are critical for transforming your wax tree into a metal piece:
1.Burnout
Heat the investment material containing the wax tree in a kiln to a temperature high enough to melt and vaporize the wax, leaving behind a hollow cavity in the shape of your original model.
The burnout process typically takes several hours, depending on the size and complexity of the wax tree.
2.Casting
Once the burnout is complete, pour molten metal into the investment material cavity through the sprue system.
The metal fills the cavity, solidifying into the shape of your original resin model.
Allow the metal to cool and harden before removing it from the investment material.
Refining Your Cast Jewelry Piece
After the casting process, your jewelry piece will require some refinement to achieve its final form. Follow these steps to refine your cast piece:
1.Trimming
Remove the sprues and excess metal from your cast piece using saws, snips, or other cutting tools.
Smooth the surfaces where the sprues were attached using files or sandpaper.
2.Polishing
Polish your jewelry piece using a polishing wheel, rouge, or other polishing compounds to achieve the desired finish.
Buff the piece until it reaches the desired level of shine and smoothness.
3.Stone Setting
If your design includes gemstones, set them into the appropriate settings using professional stone-setting tools and techniques.
4.Plating
Apply a metal plating, such as rhodium or gold, to enhance the appearance and durability of your jewelry piece.
By following these steps and techniques, you’ll be able to transform your DLP 3D printed resin model into a beautiful and intricate piece of jewelry. With practice and experience, you’ll refine your skills and produce even more stunning and elaborate designs.
Quality Control and Inspection
To ensure your jewelry piece meets the highest standards, perform quality control checks and inspections:
- Visual Inspection
- Examine your jewelry piece for any defects, such as scratches, dents, or misalignments. Pay close attention to stone settings, ensuring they are secure and properly aligned.
- Fit and Functionality
- If your jewelry piece is wearable, such as a ring or bracelet, check the fit and functionality. Ensure it is comfortable and secure on the wearer.
- Test any moving parts, such as clasps or hinges, to ensure they function smoothly and securely.
- Weight and Balance
- Verify that the weight and balance of your jewelry piece are appropriate for its design and intended use.
- Check that any asymmetrical elements are balanced and visually pleasing.
- Documentation
- Maintain thorough records of your design, casting, and finishing processes. Document any changes or modifications made during the production process.
- Keep track of the materials and techniques used, as well as any quality control measures taken.
- Customer Feedback
- Solicit feedback from customers or potential buyers to gauge their satisfaction with the finished jewelry piece.
- Use customer feedback to identify areas for improvement and refine your production process.
By following these post-casting refinement techniques and quality control measures, you’ll ensure your DLP 3D printed jewelry pieces meet the highest standards of craftsmanship and aesthetics. Continuously refining your skills and techniques will enable you to produce increasingly intricate and beautiful designs, ultimately setting you apart in the competitive world of jewelry design and manufacturing.
The Future of DLP 3D Printing in Jewelry Casting
As we’ve explored throughout this guide, DLP 3D printing has transformed the landscape of jewelry design and manufacturing. Its ability to produce intricate, detailed, and customizable pieces has opened up new possibilities for creativity and innovation in the industry. In this concluding section, we’ll discuss the future of DLP 3D printing in jewelry casting, including advancements in technology, emerging trends, and potential impacts on the industry.
Advancements in Technology
As DLP 3D printing technology continues to evolve, we can expect to see improvements in resolution, speed, and material compatibility. New advancements in resin formulations will enable even more precise and detailed prints, while faster print speeds will allow for more efficient production processes. Additionally, the development of new materials, such as biocompatible and eco-friendly resins, will expand the range of applications for DLP 3D printing in jewelry.
Emerging Trends in Jewelry Design
DLP 3D printing has already begun to influence trends in jewelry design, with many designers embracing the technology to create unique and innovative pieces. In the future, we can expect to see even more experimentation with form, texture, and materials, as designers push the boundaries of what is possible with DLP 3D printing. Additionally, the rise of sustainable and ethical practices in the industry will likely lead to increased demand for eco-friendly materials and production methods, further driving innovation in DLP 3D printing technology.
Potential Impact on the Jewelry Industry
The widespread adoption of DLP 3D printing in jewelry casting has the potential to significantly disrupt the industry. By enabling rapid prototyping and efficient production runs, DLP 3D printing can reduce lead times and costs, making it easier for independent designers and small businesses to compete with larger, established brands. Moreover, the technology’s ability to create highly customized and personalized pieces can lead to a shift in consumer preferences, with more people seeking out unique, one-of-a-kind jewelry items.
In conclusion, the future of DLP 3D printing in jewelry casting is bright, with ongoing advancements in technology, emerging trends in design, and potential impacts on the industry. As a jewelry designer or manufacturer, staying informed about the latest developments in DLP 3D printing can help you stay ahead of the curve and capitalize on the many opportunities presented by this cutting-edge technology. Whether you’re just starting out or looking to expand your existing business, DLP 3D printing offers a world of possibilities for creativity, efficiency, and growth in the jewelry industry.